传播模式
本教程作者: fangwei123456
单步传播与多步传播
SpikingJelly中的绝大多数模块(spikingjelly.clock_driven.rnn 除外),例如 spikingjelly.clock_driven.layer.Dropout,模块名的前缀中没有 MultiStep,表示这个模块的 forward 函数定义的是单步的前向传播:
输入 \(X_{t}\),输出 \(Y_{t}\)
而如果前缀中含有 MultiStep,例如 spikingjelly.clock_driven.layer.MultiStepDropout,则表面这个模块的 forward 函数定义的是多步的前向传播:
输入 \(X_{t}, t=0,1,...,T-1\),输出 \(Y_{t}, t=0,1,...,T-1\)
一个单步传播的模块,可以很容易被封装成多步传播的模块,spikingjelly.clock_driven.layer.MultiStepContainer 提供了非常简单的方式,将原始模块作为子模块,并在 forward 函数中实现在时间上的循环,代码如下所示:
class MultiStepContainer(nn.Sequential):
    def __init__(self, *args):
        super().__init__(*args)

    def forward(self, x_seq: torch.Tensor):
        """
        :param x_seq: shape=[T, batch_size, ...]
        :type x_seq: torch.Tensor
        :return: y_seq, shape=[T, batch_size, ...]
        :rtype: torch.Tensor
        """
        y_seq = []
        for t in range(x_seq.shape[0]):
            y_seq.append(super().forward(x_seq[t]))

        for t in range(y_seq.__len__()):
            y_seq[t] = y_seq[t].unsqueeze(0)
        return torch.cat(y_seq, 0)
我们使用这种方式来包装一个IF神经元:
from spikingjelly.clock_driven import neuron, layer, functional
import torch

neuron_num = 4
T = 8
if_node = neuron.IFNode()
x = torch.rand([T, neuron_num]) * 2
for t in range(T):
    print(f'if_node output spikes at t={t}', if_node(x[t]))
functional.reset_net(if_node)

ms_if_node = layer.MultiStepContainer(if_node)
print("multi step if_node output spikes\n", ms_if_node(x))
functional.reset_net(ms_if_node)
输出为:
if_node output spikes at t=0 tensor([1., 1., 1., 0.])
if_node output spikes at t=1 tensor([0., 0., 0., 1.])
if_node output spikes at t=2 tensor([1., 1., 1., 1.])
if_node output spikes at t=3 tensor([0., 0., 1., 0.])
if_node output spikes at t=4 tensor([1., 1., 1., 1.])
if_node output spikes at t=5 tensor([1., 0., 0., 0.])
if_node output spikes at t=6 tensor([1., 0., 1., 1.])
if_node output spikes at t=7 tensor([1., 1., 1., 0.])
multi step if_node output spikes
 tensor([[1., 1., 1., 0.],
        [0., 0., 0., 1.],
        [1., 1., 1., 1.],
        [0., 0., 1., 0.],
        [1., 1., 1., 1.],
        [1., 0., 0., 0.],
        [1., 0., 1., 1.],
        [1., 1., 1., 0.]])
两种方式的输出是完全相同的。
逐步传播与逐层传播
在以往的教程和样例中,我们定义的网络在运行时,是按照 逐步传播(step-by-step) 的方式,例如上文中的:
if_node = neuron.IFNode()
x = torch.rand([T, neuron_num]) * 2
for t in range(T):
    print(f'if_node output spikes at t={t}', if_node(x[t]))
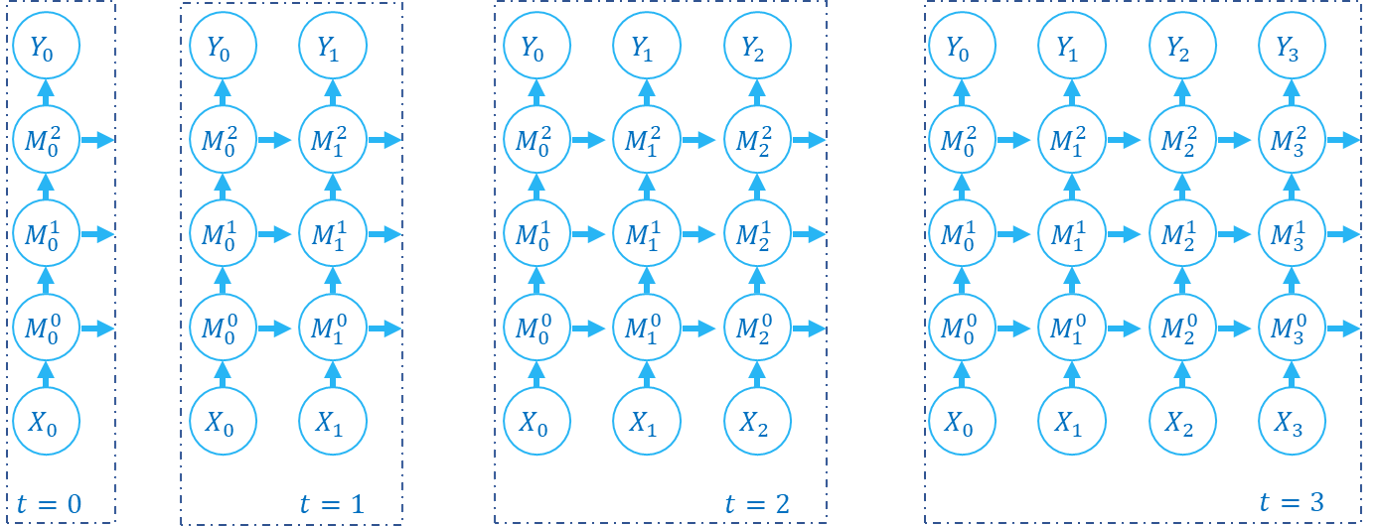
逐步传播(step-by-step),指的是在前向传播时,先计算出整个网络在 \(t=0\) 的输出 \(Y_{0}\),然后再计算整个网络在 \(t=1\) 的输出 \(Y_{1}\),……,最终得到网络在所有时刻的输出 \(Y_{t}, t=0,1,...,T-1\)。例如下面这份代码(假定 M0, M1, M2 都是单步传播的模块):
net = nn.Sequential(M0, M1, M2)

for t in range(T):
    Y[t] = net(X[t])
前向传播的计算图的构建顺序如下所示:
对于SNN以及RNN,前向传播既发生在空域也发生在时域,逐步传播 逐步计算出整个网络在不同时刻的状态,我们可以很容易联想到,还可以使用另一种顺序来计算:逐层计算出每一层网络在所有时刻的状态。例如下面这份代码(假定 M0, M1, M2 都是多步传播的模块):
net = nn.Sequential(M0, M1, M2)

Y = net(X)
前向传播的计算图的构建顺序如下所示:
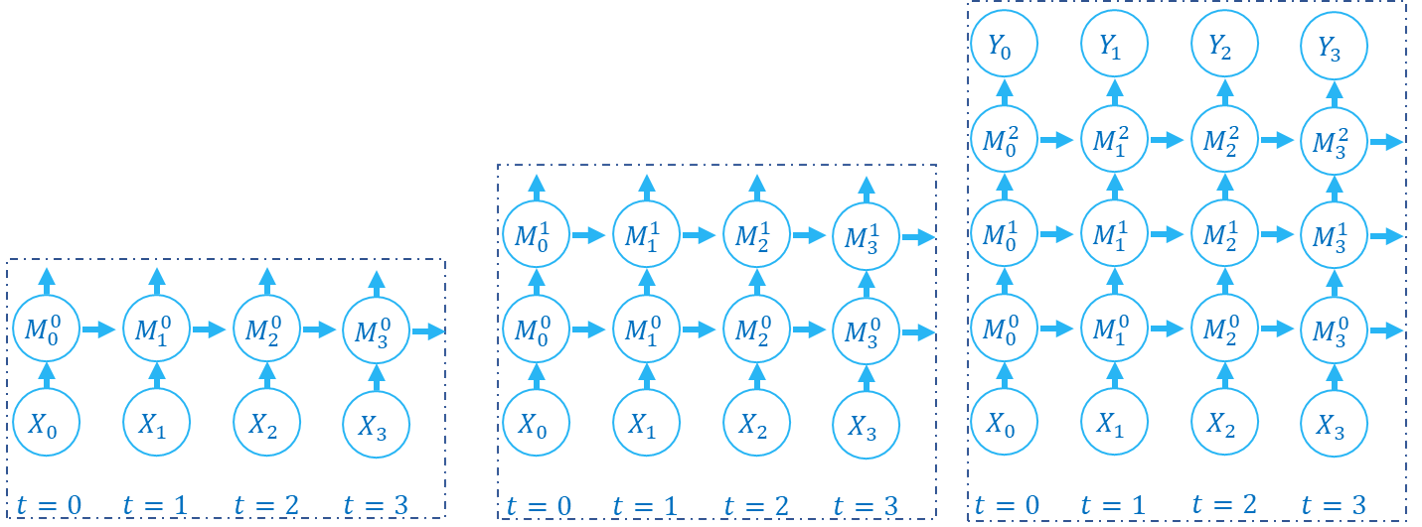
我们称这种方式为 逐层传播(layer-by-layer)。逐层传播 在RNN以及SNN中也被广泛使用,例如 Low-activity supervised convolutional spiking neural networks applied to speech commands recognition 通过逐层计算的方式来获取每一层在所有时刻的输出,然后在时域上进行卷积,代码可见于 https://github.com/romainzimmer/s2net。
逐步传播 与 逐层传播 遍历计算图的顺序不同,但计算的结果是完全相同的。但 逐层传播 具有更大的并行性,因为当某一层是无状态的层,例如 torch.nn.Linear,逐步传播 会按照下述方式计算:
for t in range(T):
    y[t] = fc(x[t])  # x.shape=[T, batch_size, in_features]
而 逐层传播 则可以并行计算:
y = fc(x) # x.shape=[T, batch_size, in_features]
对于无状态的层,我们可以将 shape=[T, batch_size, ...] 的输入拼接成 shape=[T * batch_size, ...] 后,再送入这一层计算,避免在时间上的循环。spikingjelly.clock_driven.layer.SeqToANNContainer 在 forward 函数中进行了这样的实现。我们可以直接使用这个模块:
with torch.no_grad():
    T = 16
    batch_size = 8
    x = torch.rand([T, batch_size, 4])
    fc = SeqToANNContainer(nn.Linear(4, 2), nn.Linear(2, 3))
    print(fc(x).shape)
输出为:
torch.Size([16, 8, 3])
输出仍然满足 shape=[T, batch_size, ...],可以直接送入到下一层网络。
包装前向传播
使用 SeqToANNContainer 对无状态的ANN层进行包装后,网络的 state_dict 中层的名字 .keys() 会发生变化,因为我们额外引入了一个包装器。例如:
net_step_by_step = nn.Sequential(
    nn.Conv2d(3, 16, kernel_size=3, padding=1, bias=False),
    nn.BatchNorm2d(16),
    neuron.IFNode()
)

net_layer_by_layer = nn.Sequential(
    layer.SeqToANNContainer(
        nn.Conv2d(3, 16, kernel_size=3, padding=1, bias=False),
        nn.BatchNorm2d(16),
    ),
    neuron.MultiStepIFNode()
)

print('net_step_by_step.state_dict:', net_step_by_step.state_dict().keys())
print('net_layer_by_layer.state_dict:', net_layer_by_layer.state_dict().keys())
输出为:
net_step_by_step.state_dict: odict_keys(['0.weight', '1.weight', '1.bias', '1.running_mean', '1.running_var', '1.num_batches_tracked'])
net_layer_by_layer.state_dict: odict_keys(['0.0.weight', '0.1.weight', '0.1.bias', '0.1.running_mean', '0.1.running_var', '0.1.num_batches_tracked'])
名称不一样,会给加载模型权重带来麻烦。例如,我们想构建一个多步版本的Spiking ResNet-18 (spikingjelly.clock_driven.model.spiking_resnet.spiking_resnet18),
且希望这个网络能够加载ANN的预训练模型权重。直接使用 SeqToANNContainer 构建出的网络,state_dict 与ANN的并不相同,无法直接加载。为了避免
这种问题,我们可以不使用 SeqToANNContainer 对ANN层包装,而是转为包装ANN层的前向传播代码。下面是示例代码:
class NetStepByStep(nn.Module):
    def __init__(self):
        super().__init__()
        self.conv = nn.Conv2d(3, 16, kernel_size=3, padding=1, bias=False)
        self.bn = nn.BatchNorm2d(16)
        self.sn = neuron.IFNode()

    def forward(self, x):
        # x.shape = [N, C, H, W]
        x = self.conv(x)
        x = self.bn(x)
        x = self.sn(x)
        return x


class NetLayerByLayer1(NetStepByStep):

    def forward(self, x_seq):
        # x_seq.shape = [T, N, C, H, W]
        x_seq = functional.seq_to_ann_forward(x_seq, [self.conv, self.bn])
        x_seq = functional.multi_step_forward(x_seq, self.sn)
        return x_seq


class NetLayerByLayer2(NetStepByStep):
    def __init__(self):
        super().__init__()

        # replace single-step neuron to multi-step neuron
        del self.sn
        self.sn = neuron.MultiStepIFNode()

    def forward(self, x_seq):
        # x_seq.shape = [T, N, C, H, W]
        x_seq = functional.seq_to_ann_forward(x_seq, [self.conv, self.bn])
        x_seq = self.sn(x_seq)
        return x_seq
NetStepByStep, NetLayerByLayer1, NetLayerByLayer2 的 state_dict.keys() 完全相同的,模型权重可以互相加载。