Triton 后端#
本教程作者: 黄一凡 (AllenYolk)
English version: Triton Backend
SpikingJelly 0.0.0.1.0 版本引入了 Triton 后端,作为本框架继 PyTorch 和 CuPy 之后的第三种后端。相比使用 CUDA 撰写的 CuPy 后端,Triton 后端具有更好的可读性、扩展性和可维护性,更容易达到较高的 GPU 利用率,且有扩展到 其他硬件平台 的潜力。
本教程聚焦于预定义神经元的 Triton 后端用法。关于基于自定义动力学函数自动生成内核,请参考 FlexSN。
本教程需要如下的准备及前置知识:
安装好 Triton 。推荐使用
triton >= 3.3.1。熟悉 SpikingJelly 的 神经元 模块。
使用预定义的 Triton 神经元内核#
前向传播与反向传播#
神经元 Triton 后端的启用方式和 CuPy 后端类似。以 LIFNode 为例:
import torch
from spikingjelly.activation_based import neuron

n = neuron.LIFNode(step_mode="m", backend="triton").to("cuda:0")
x = torch.randn([16, 1, 3, 32, 32], device="cuda:0") # [T, B, C, H, W]

s = n(x)
print(s.device, s.shape, s.mean())
# cuda:0 torch.Size([16, 1, 3, 32, 32]) tensor(0.0313, device='cuda:0')
这里,我们构造了一个以多步模式 step_mode="m" 运行的 LIF 神经元,并启用 Triton 后端。将神经元和输入张量都移动到 "cuda:0" 设备上后,即可使用 Triton 后端完成前向传播计算。 Triton 后端当然也支持反向传播,且会得到与其它后端(几乎)完全相同的结果:
import torch
import torch.nn.functional as F
from spikingjelly.activation_based import neuron

n_triton = neuron.LIFNode(
    step_mode="m", backend="triton", store_v_seq=True
).to("cuda:0")
n_torch = neuron.LIFNode(
    step_mode="m", backend="torch", store_v_seq=True
).to("cuda:0")

x = torch.randn([16, 1, 3, 32, 32], device="cuda:0") # [T, B, C, H, W]
x_triton = x.clone().requires_grad_(True)
x_torch = x.clone().requires_grad_(True)

s_triton = n_triton(x_triton)
s_torch = n_torch(x_torch)
v_triton = n_triton.v_seq
v_torch = n_torch.v_seq

grad = torch.randn_like(s_triton)
s_triton.backward(grad)
s_torch.backward(grad)

assert torch.allclose(s_triton, s_torch)
print(s_triton.mean()) # tensor(0.0309, device='cuda:0', grad_fn=<MeanBackward0>)
assert torch.allclose(v_triton, v_torch)
print(v_triton.mean()) # tensor(-0.0702, device='cuda:0', grad_fn=<MeanBackward0>)
assert torch.allclose(x_triton.grad, x_torch.grad, rtol=1e-6, atol=1e-6)
print(
    F.cosine_similarity(x_triton.grad.flatten(), x_torch.grad.flatten(), dim=0)
) # tensor(1., device='cuda:0')
速度测算#
Triton 后端支持 torch.float16。下面,我们使用 Triton 提供的性能测算工具 triton.testing 来对比不同后端的速度:
import torch
import triton
from spikingjelly.activation_based import neuron, functional

DEVICE = "cuda:0"

def forward_backward(net, x_seq):
    y_seq  = net(x_seq)
    y_seq.sum().backward()
    x_seq.grad = None
    functional.reset_net(net)


@triton.testing.perf_report(
    triton.testing.Benchmark(
        x_names=["T"],
        x_vals=[4*i for i in range(1, 9)],
        line_arg="backend",
        line_vals=["torch", "cupy", "triton"],
        line_names=["torch", "cupy", "triton"],
        styles=[
            ('green', ':'), ('blue', '--'), ('red', '-.'),
        ],
        ylabel='Execution Time (ms)',
        plot_name='Performance-float16',
        args={"N": 64, "C": 64*32*32, 'dtype': torch.float16},
    )
)
def benchmark(T, N, C, dtype, backend):
    net = neuron.LIFNode(
        backend=backend,
        step_mode='m',
    ).to(device=DEVICE, dtype=dtype)
    x_seq = torch.rand(
        [T, N, C], device=DEVICE, dtype=dtype, requires_grad=True
    )
    results = triton.testing.do_bench(
        lambda: forward_backward(net, x_seq),
        quantiles=[0.5, 0.2, 0.8],
        grad_to_none=[x_seq]
    )
    return results

benchmark.run(save_path="./logs", print_data=True, show_plots=True)
在单个 GeForce RTX 4090 上运行,结果如下:
Performance-float16:
    T      torch      cupy    triton
0   4.0   0.992784  0.667648  0.771072
1   8.0   3.459072  1.338368  0.857088
2  12.0   7.058432  1.988608  1.289216
3  16.0  11.737088  2.630736  1.704896
4  20.0  17.557505  3.263488  2.115584
5  24.0  24.517120  3.902464  2.533376
6  28.0  32.649216  4.535296  2.940928
7  32.0  41.872896  5.189120  3.365888
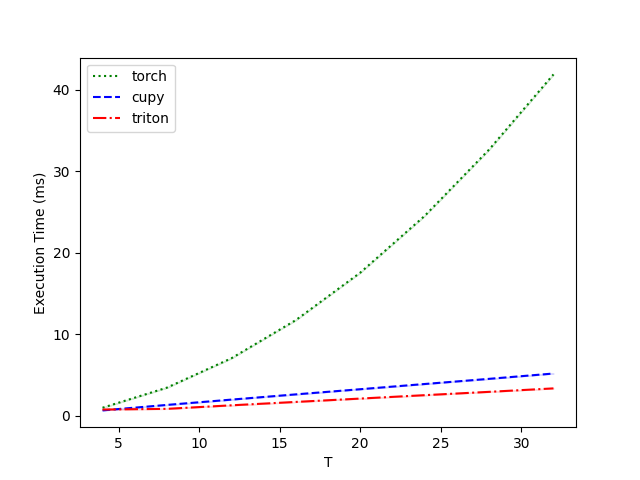
可见,数据规模和序列长度 T 都较大时,Triton 后端相比 CuPy 和 PyTorch 后端具有明显的速度优势。
警告
在使用预定义的 Triton 神经元内核时,需注意:
目前仅最常用的
IFNode,LIFNode和PLIFNode配备了 Triton 内核。我们将在后续更新中逐步添加更多的 Triton 内核。Triton 后端应在 GPU 上运行。
Triton 后端仅支持多步运行模式
step_mode="m"。